TL;DR:
- Thoroughly inspecting used trailers before purchase prevents costly surprises related to structural damage, maintenance, and compliance issues. Proper preparation with the right tools and documentation is essential to identify defects in brakes, tires, electrical systems, and the frame. Addressing critical issues or hiring a professional inspector ensures safety, legality, and long-term reliability in fleet operations.
Buying a used trailer without a proper inspection is one of the most expensive mistakes you can make in trucking or fleet operations. Inspecting used trailers thoroughly before any money changes hands protects you from hidden structural damage, deferred maintenance, and regulatory exposure that can surface the moment you hook up and hit the road. Drivers are legally responsible for defects upon hookup regardless of who owned the trailer before them, which means the seller’s problems become your problems the second you sign. This guide walks you through every stage of a thorough trailer inspection, from what to bring to what to walk away from.
Table of Contents
- Key takeaways
- Inspecting used trailers starts before you arrive on the lot
- Structural and mechanical checks done right
- Electrical systems, lighting, and safety equipment
- Flooring, walls, and surfaces: what hides beneath the finish
- Documentation, compliance, and what to do with your findings
- What experience has taught me about buying used trailers
- Find your next trailer with confidence at Appletruckandtrailer
- FAQ
Key takeaways
| Point | Details |
|---|---|
| Prepare before you arrive | Bring a 7-pin tester, flashlight, camera, and gloves, and request all title and maintenance documents in advance. |
| Brakes, lights, and tires are your biggest risks | These three systems account for over 75% of out-of-service violations and deserve the most scrutiny during inspection. |
| Cosmetic repairs hide real damage | Fresh paint, patch welds, and inconsistent steel thickness often signal structural repairs that did not restore integrity. |
| Documentation is part of the inspection | A clean title, DOT inspection history, and maintenance records reveal patterns that no physical check can catch. |
| Know when to walk away | Critical brake failures, active weld cracks, or missing compliance records are not negotiable. They are reasons to pass. |
Inspecting used trailers starts before you arrive on the lot
The physical inspection is only half the job. How you prepare beforehand determines how much you actually find when you get there.
The tools you need to bring
Show up with the right equipment, or you will miss things that cost you later. Here is what belongs in your bag:
- A bright flashlight (LED preferred) for crawling under frames and into wheel wells
- A 7-pin trailer tester to check electrical connections and identify wiring faults
- A tape measure or axle alignment tool for checking frame geometry
- A camera or smartphone to document everything you find
- Work gloves for getting under the trailer without hesitation
- A rubber mallet for tapping welds and listening for hollow or cracked steel
A 7-pin tester costs between $9 and $30 and can save you from a $200 to $500 rewiring bill you never expected. That is one of the best returns on investment you will find in pre-purchase due diligence.
Documents to request before the physical check
Before you touch the trailer, request the following paperwork from the seller:
- The title, free of liens and with no salvage designation
- Previous DOT inspection reports or FMCSA compliance records
- Maintenance logs showing brake, tire, and electrical service history
- Any repair invoices indicating what was fixed and when
Under 49 CFR 396.17, commercial trailers over 10,001 lbs GVWR must undergo annual inspections. If the seller cannot produce the most recent inspection report, that gap alone tells you something about how the trailer was managed.
Pro Tip: Review the trailer specifications against your operational needs before you inspect. A trailer built for dry goods does not always perform well when converted for heavier or refrigerated loads. Understanding what you need helps you focus the inspection on the right systems. Check out this trailer specifications guide for a breakdown of what to look for.
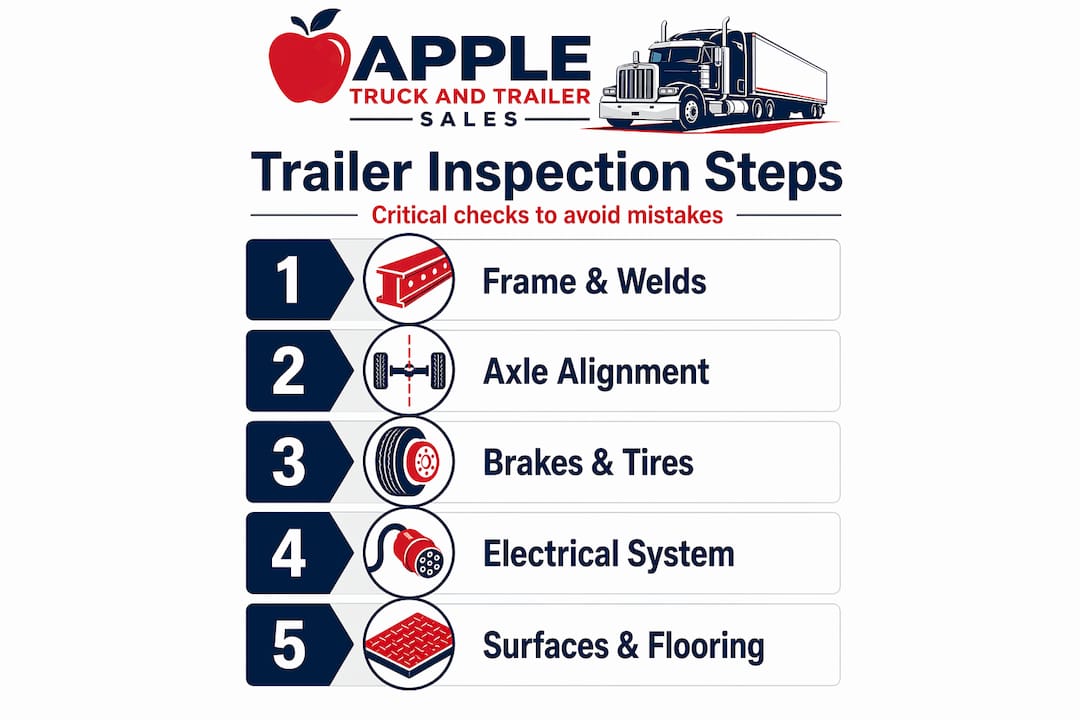
Structural and mechanical checks done right
Once you are on-site, start from the ground up. The frame and mechanical systems are where the most serious problems hide and where repair costs climb fastest.
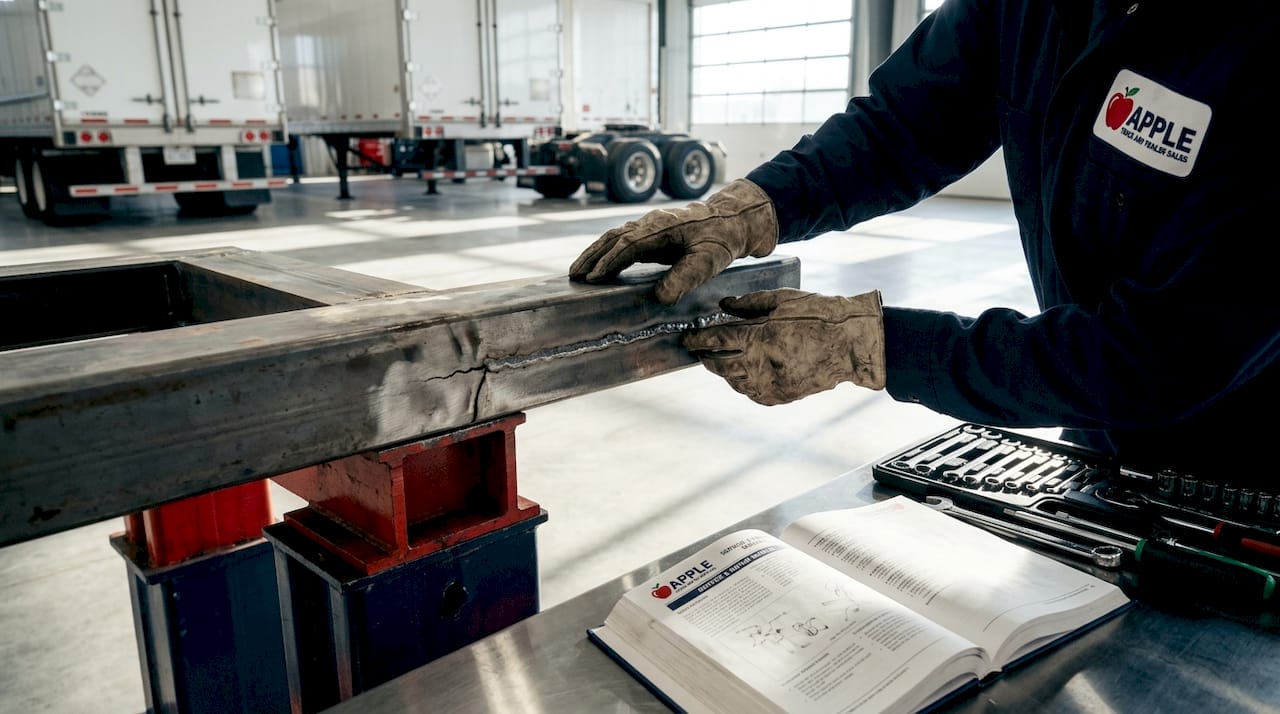
How to evaluate the frame and welds
Walk the full perimeter of the trailer and crouch down to inspect the frame rails at eye level. You are looking for:
- Visible cracks in welds, especially near crossmembers and gussets
- Rust streaks originating from hairline weld gaps, which indicate active stress cracking
- Fresh, localized paint or primer over a section of frame that does not match the surrounding metal
- Mismatched steel thickness or visible patch plates bolted or welded over existing damage
Cracked welds are structural failures, not surface-level wear. Proper repair requires removing the cracked material and assessing the underlying metal fatigue. Cosmetic welding over a crack masks ongoing stress and risks sudden failure under a full load. Tap suspect areas with a rubber mallet. A dull thud where you expect a solid ring is a warning sign.
Suspension and axle alignment
Check that axles sit square to the frame by standing behind the trailer and sighting down both sides. Misaligned axles cause rapid, uneven tire wear and can pull a trailer dangerously during braking. Inspect suspension hangers and leaf springs for cracks, missing hardware, or any sign of recent replacement that does not match the trailer’s age.
Brakes and tires: where out-of-service orders begin
Brakes, lights, and tires cause over 75% of out-of-service violations, and visual cleanliness rarely tells you whether these systems are actually sound. For brakes, measure pushrod stroke at 90 psi air supply. Brake chamber stroke measurement under air pressure detects wear that visual inspection alone misses. Look for over-stroked chambers, worn brake lining, and leaking glad hand seals.
For tires, check tread depth with a gauge and look for uneven wear patterns across the width of the tread. Bulges in the sidewall and cracking at the bead signal age-related failure risk. Uneven tire wear and over-stroked brake chambers are among the most commonly overlooked defects on used trailers. Buyers often underestimate suspension, tires, and brakes as a cluster cost, and addressing all three together after purchase can push your real cost well above the purchase price.
Pro Tip: If the trailer has a hydraulic tipping system, test it with multiple full cycles under realistic load conditions. Slow or unstable lifting motion suggests cylinder wear or hinge misalignment that may not appear in static visual checks.
Electrical systems, lighting, and safety equipment
Electrical issues are the most commonly deferred maintenance item on used trailers. They are cheap to ignore and expensive to discover after purchase.
Use your 7-pin tester to verify each pin function at the front plug. Work through this list systematically:
- Brake lights: Apply pressure to confirm they illuminate on both sides
- Turn signals: Check left and right independently at the rear and side markers
- Running and marker lamps: Walk the trailer perimeter with the tractor powered up
- Reverse lights: Confirm function if the trailer type includes them
What you are looking for beyond non-working lights is evidence of how the electrical system has been maintained. Corroded connectors, temporary wire splices, and incompatible plug types are red flags that indicate years of quick fixes instead of proper repairs. Mismatched connectors can also delay legal operation if your tractor and the trailer do not share compatible wiring standards.
Safety chains should be present, intact, and rated for the trailer’s gross weight. Check that reflective tape meets the current requirements and runs the full length of both sides. Trailers that have been parked for extended periods often have reflective tape that has faded, peeled, or gone missing entirely.
Pro Tip: Inspect wiring harnesses along the full length of the trailer, not just at the plug. Damage from road debris, heat, or improper tie-down often occurs mid-harness, where it is harder to spot but just as likely to cause failures.
Flooring, walls, and surfaces: what hides beneath the finish
The trailer’s interior surfaces and exterior panels tell a story about how the unit was used and what kind of water damage may be lurking.
Start at the floor. Walk the entire deck and feel for soft spots, especially near the edges where water tends to pool. On wood-floor dry vans, press down firmly in the corners and along the side rails. Softness underfoot means rot, and replacing trailer flooring can run into thousands of dollars depending on the trailer length and floor material.
On the walls, look for staining patterns that indicate water intrusion. Vertical streaks from the ceiling indicate a roof seal failure that has been actively leaking. Check all roof seams and the caulking around any installed vents, markers, or antenna mounts. Dried, cracked sealant is a repair waiting to happen.
Pay attention to inconsistencies in the paint and finish. Inconsistent workmanship, fresh localized paint, and mismatched steel thickness are major red flags. A trailer that has been repainted in a specific section has almost certainly had body damage in that area. The question is whether the underlying structure was actually repaired or just covered up. For a broader look at trailer types and how their construction affects what to inspect, the dry van vs. reefer vs. flatbed comparison from Firehouse Freight provides a useful reference.
Documentation, compliance, and what to do with your findings
After the physical check, you need to reconcile what you found on the trailer with what the paperwork says.
How to interpret the findings
Not every defect is a deal-breaker. Use this framework to sort your findings:
| Finding | Severity | Recommended action |
|---|---|---|
| Active weld cracks in frame rail | Critical | Walk away or require professional repair before purchase |
| Over-stroked brake chambers | High | Negotiate repair or significant price reduction |
| Worn but legal tire tread | Moderate | Account for replacement cost in offer price |
| Minor lighting failures | Low | Confirm cost of repair and adjust offer accordingly |
| Missing maintenance records | Variable | Request seller to obtain or treat as unverified history |
Structured inspections with documented findings reduce the likelihood of roadside out-of-service orders after purchase. Gaps in inspection records contribute to a significant portion of commercial vehicle enforcement actions, which is a liability that lands on the new owner almost immediately.
For title verification, run a lien check through your state’s DMV records before closing. A salvage title is not always a disqualifier for every buyer, but you need to know it exists. It affects insurance, resale value, and sometimes DOT compliance depending on how the trailer is being used.
Pro Tip: If you are unsure about the severity of a structural or mechanical finding, hire a professional inspector before closing. The cost of a trailer inspection by a qualified technician is a fraction of what a missed defect will cost you in repairs or downtime.
For guidance on the full purchasing process beyond the inspection itself, the used trailers buying guide at Appletruckandtrailer covers the broader decision-making framework for fleets.
What experience has taught me about buying used trailers
I have watched buyers walk away from solid trailers because they were intimidated by surface rust on the frame rails, and I have watched others hand over money for trailers that looked immaculate but had active weld cracks hidden under a fresh coat of paint. Cosmetic condition is almost meaningless as a predictor of trailer quality. The stuff that matters is almost always underneath.
In my experience, the brake and electrical systems are where corners get cut most often on used trailers. These systems are expensive to repair correctly, so sellers who did not want to spend the money tend to address them just enough to make the trailer move. A trailer that brakes unevenly or shows two or three wiring fixes along the harness has been managed reactively, not proactively, and that pattern repeats.
The legal exposure piece is something buyers consistently underestimate. Drivers become responsible for trailer defects at hookup, which means a defect the previous owner lived with for months becomes your compliance problem the moment you drive off the lot. Price matters, but it should never outweigh safety or the risk of a roadside out-of-service order that costs you a day of revenue.
My honest advice: if you are not confident in your ability to assess every system on the trailer, bring someone who is. The inspection cost is always worth it.
— Andrew
Find your next trailer with confidence at Appletruckandtrailer
Appletruckandtrailer has been helping businesses and individual buyers find quality used trailers in Massachusetts, Rhode Island, Connecticut, and New Hampshire since 1986. Their team understands what a proper trailer condition assessment looks like because they have been doing it for decades across thousands of units. Whether you are sourcing a single dry van or expanding a fleet, you can browse their current inventory and get support from people who know every system you need to check.
For buyers who want expert guidance before committing, Appletruckandtrailer offers used trailer sales in Massachusetts backed by real inspection expertise. You can also explore their buying a used trailer guide to understand how to evaluate your options before you walk onto any lot. Contact their team directly to arrange a site visit or get a quote tailored to your operational needs.
FAQ
What should I bring when inspecting a used trailer?
Bring a flashlight, 7-pin trailer tester, tape measure, camera, and work gloves. These tools cover the core electrical, structural, and mechanical checks you need to complete a thorough inspection.
What are the most common defects found on used trailers?
Brakes, lights, and tires account for over 75% of out-of-service violations on commercial trailers. Cracked welds, corroded wiring, and floor rot are also frequently found during used trailer inspections.
How do I know if a structural repair was done correctly?
Look for inconsistent paint, mismatched steel thickness, and surface welds over existing cracks. These are signs that damage was covered rather than properly repaired. A qualified welder or inspector can assess whether the repair restored actual structural integrity.
Does a used trailer need a current DOT inspection record?
Yes, commercial trailers over 10,001 lbs GVWR must have an annual inspection under 49 CFR 396.17. Ask the seller for the most recent inspection certificate and be cautious if it cannot be produced.
When should I hire a professional inspector for a used trailer?
Hire a professional when you find structural concerns you cannot fully evaluate, when the trailer’s history is incomplete, or when the purchase price is significant enough that a missed defect would be costly. The inspection fee is almost always justified against the risk.
Recommended
- 7 Key Tips for Buying Storage Trailers for Sale – Apple Truck & Trailer
- How to buy used trailers: a practical guide for fleets – Apple Truck & Trailer
- Trailer Specifications Explained: Key Insights for Buyers – Apple Truck & Trailer
- Keeping Trailers Roadworthy: Safety and Compliance Essentials – Apple Truck & Trailer